
When creating a new composite, you can begin setting up the composite by either selecting Composite > New Composite on the Template Designer main menu or simply selecting and double-clicking on one of the templates on the lower part of the window.
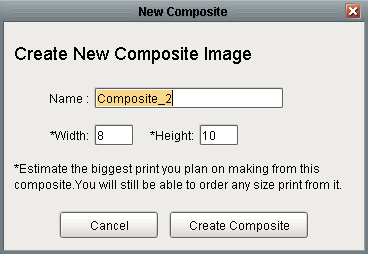
In either situation, the New Composite window will open where you have the ability to name the composite, and adjust or check the dimensions of the over all composite size. If the dimensions are adjusted and differ from the dimensions of the template you chose to use, a window will open named Different Aspect Ratios and you have the option to make the template fit in the composite. If you choose to make the template fit, it will be adjusted to completely fit the composite area that was defined. At this point the composite is created, and you can begin adjusting and developing it as needed. The Images tab found in the lower left corner of the window can be selected, where you will find all of the images for the group selected in the drop down. The images can be dragged from this tab to any available image nodes.